An Easy Preloader GIF Making Workflow in Inkscape and Imagemagick
August 08, 2015

Preloaders are animated images shown on a webpage while the main content is loading. The animation gives the viewer a sense that some process is happening in the background and fetching the data that they wish to see. There are several ways of showing such an animation - CSS3, animated GIFs, Flash. This tutorial shows a relatively simple method of creating animated preloader GIFs using two popular open source softwares - Inkscape and Imagemagick.
Step 1: Create the basic sketch in Inkscape
In this tutorial, we will start with a basic vector sketch in Inkscape and use that to create the animation. If you are beginning with vector art creation, there are a variety of tutorial available online. I have included here an example SVG pattern to start, but you have the choice of using your own pattern.

Step 2: Create copies of the pattern to imitate motion
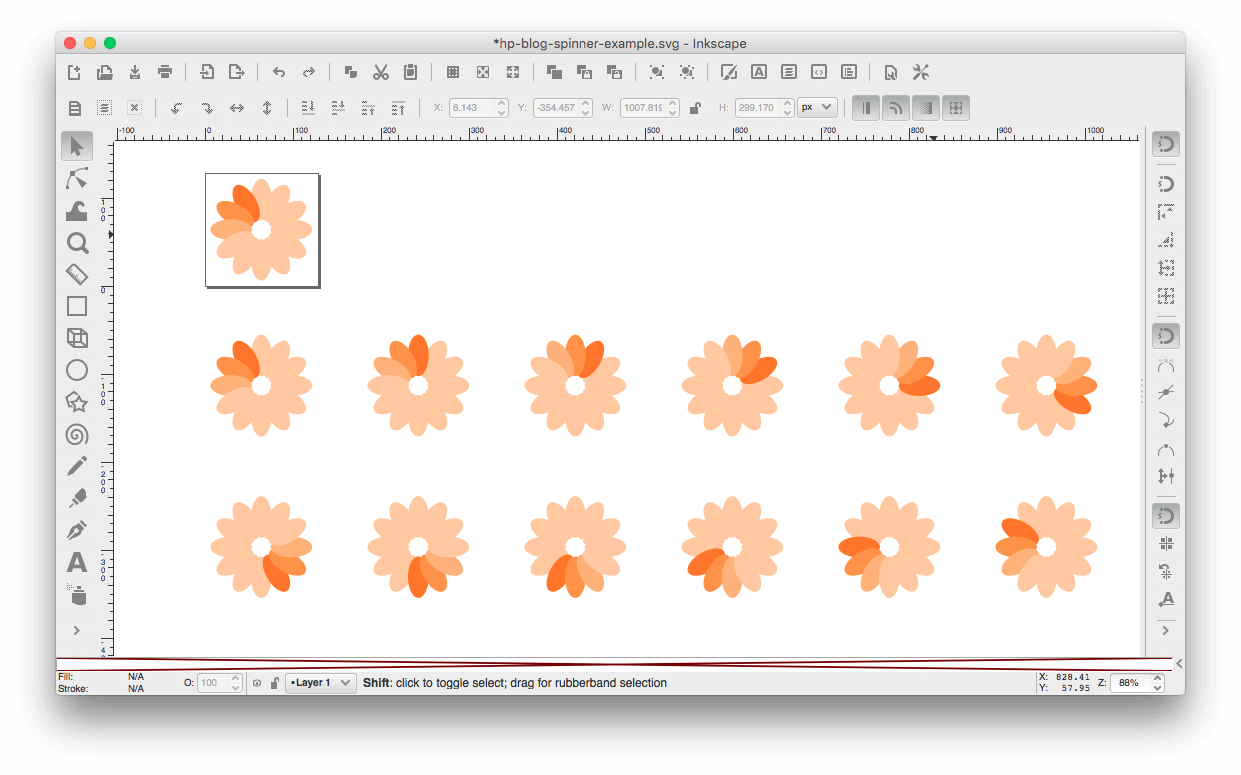
To create an illusion of motion, we will rotate the image in small steps. For this, we need to create multiple copies of the pattern, with each one slightly rotated with respect to the previous one. Make sure the pattern is selected and go to Edit → Clone → Create Tiled Clones.... A dialogue box will open with various option for creating clones of the pattern. Note that our pattern has 12 petals. So we will create 12 copies. In Rows, Columns field, enter 1 and 12. Before we set any transformation options to the clones, we will make sure all the values are set to defaults. Click the Reset button. Now switch to Rotation tab. Set the angle field to 30 under Per column. Click Create. You will see 12 copies of the pattern created with rotations applied in 30 degree increments.
Step 3: Export patterns as PNGs
When Inkscape creates tiled clones, it keeps the original object. Select the pattern that sits the position of the original one and drag it to a side. You will see the original pattern sitting under that clone. Select all patterns except the original one. You should have selected 12 patterns. Press Cmd + Shift + E (Ctrl + Shift + E on Windows) to open the Export PNG Image dialogue box. Make sure Selection tab is selected. This means that only the selected objects will be exported to PNG. Check the Batch export 12 selected objects box. All the options above it will gray-out. Click Export. Inkscape will export 12 PNGs to the same folder where you saved the SVG file. Notice that Inkscape automatically numbers the patterns in increasing order.
Step 4: Create a GIF file using ImageMagick
Now you can minimize or close Inkscape. Open a Terminal or command prompt window and cd to the folder where the exported PNGs are located. Assuming you have ImageMagick installed, execute -
convert -delay 10 -resize 64x *.png preloader.gif
Here the delay option specifies that a 10 millisecond delay should be used between the consecutive frames of the GIF. You can change this number until you get the right animation speed. The resize option specifies a width of 64 pixels. This is generally sufficient for preloader type of images. You can change the wildcard selector for PNG files so that only the 12 PNGs that we exported are selected. If everything went right, the spinner should look like the one below.

You can optimize the GIF by using applications like GIFsicle. For creating more advanced preloader GIFs, you can consider using other softwares like Adobe After Effects.
- design
- how-to